Thursday, January 30, 2014

Creamy Chicken Verde Enchiladas


Creamy Chicken Verde Enchiladas
Adapted from Joyful Mommas Kitchen

Chicken Filling
2 lbs. chicken breast
butter/EVOO
1/4 diced onion
salt, pepper, taco seasoning

White Sauce
3 T butter
3 T flour
2 c. chicken broth
1 c. sour cream/greek yogurt
1-4 oz. can diced green chilies
1 or 2 boiled and diced jalapenos

2-3 generous handfuls Monterrey Jack cheese
9-10 flour soft taco tortillas

1. Saute chicken breasts in butter/olive oil with onions.  Season with taco seasoning, salt, and pepper. When chicken is cooked through, shred it with forks or an electric mixer. Set aside until you assemble enchiladas.

2. Prepare enchilada sauce by first making a roux with 3 T butter and 3 T flour.  Melt butter over medium heat.  Add in flour.  Allow the butter and flour to cook for a couple of minutes to get rid of the real "flour-y" taste. Do not let roux burn--it should just get slightly golden and bubbly.  Whisk in chicken broth.  Allow the sauce to thicken a bit before adding in sour cream, diced green chilies, and jalapenos.  (For the jalapenos, I boil them whole until they are fork tender.  When I remove them from heat, I let them cool for a few minutes before seeding and dicing them. The added jalapeno makes these enchiladas much more flavorful.  For spicier enchiladas, I would dice with seeds still intact.)

3. Assemble the enchiladas in a 9x13 baking dish.  Fill tortillas with shredded chicken, shredded cheese, and a drizzle of sauce.  Roll tightly, placing seam-side down.  Pour remaining sauce on top of enchiladas.  Top with cheese.

4. Bake @ 350 for 25-30 minutes.  Broil on Hi for the last 2 minutes so cheese can get toasted and browned.  Serve with Tomato-Salsa Rice, a vegetable, maybe some corn, or perhaps avocado drenched in lime?  


Sunday, January 19, 2014

UGLY Chicken A La Christine

I named this chicken after my beloved boyfriend's mother.  She made this once over the summer when I was in Virginia and it wasn't like anything else I had ever eaten!  I was surprised by how tasty it is, especially because it's not the most visually appealing food--as shown in these pictures!  It doesn't get the UGLY in front of it's name because of Christine--she is actually a bombshell.  (Normal 50 year olds shouldn't be allowed to look as fantastic as her!)  It gets the UGLY in front of it's name because people are sometimes a little hesitant to taste it because it's so ugly!  Despite its appearance, however, give it a taste and you won't be disappointed!

Tastes WAY better than it looks!

It is made with an ingredient that I find particularly odd--dried beef!  Yikes! "Dried" and "beef" in the same product name, under any normal circumstances, make me worry.  Who wants beef that's dried out and comes in a little jar that doesn't expire for months?! Well, maybe I just think it's weird because my family never consumed dried beef while I was growing up.  I'm sure my mother would have had no idea what to do with it!  Or, perhaps it's more of a southern-type ingredient--you know, it's used in Cream Chipped Beef.  Either way, this dish makes excellent use of dried beef--it adds a nice saltiness, and now I'm not as skeptical of it!

I found this in the store by the tuna, Spam, etc.

Browsing the internet, I learned that this isn't solely a creation of Christine's.  But, she gets credit for introducing this to me.  Since this summer, I've made it for my family, and they've also enjoyed it as much as I do! The chicken is tender and slow-cooked, the cream sauce is divine and tastes great with mashed potatoes, and the bacon and beef give it lots of flavor.

STEP ONE: Line the bottom of a 9x13 glass baking dish with dried beef.  No need to grease dish.  You can also use like a glass casserole/hot dish.

STEP TWO: Wrap 6 chicken breasts with 2-3 slices of the dried beef and 1 piece of bacon.  I had two extra pieces of bacon so I also threw those in there!  


OPTIONAL: You can definitely throw in some mushrooms!  I put some sliced white button mushrooms on 1/2 only, because I knew my brother wouldn't touch this with a 10 ft. pole if it had visible 'shrooms!

STEP THREE: Combine 8 oz. (1 cup) of sour cream with 1 can of Cream of Mushroom soup.  Spread atop chicken and mushrooms.  

STEP FOUR: Cover with aluminum foil.  Bake @275 for ~3 hours.  I like to take it out at the halfway mark just to mix the sauce because it separates a bit. I also stir it again, then cook uncovered for the last 15 minutes or so.


***This will be very soupy if you make it in the slow cooker! NO BUENO!


Wednesday, January 8, 2014

Honey-Nut Encrusted Salmon Fillets

  Lately, my family has been partaking in Salmon Sunday, which is great because salmon is good-tasting and good-for-you. Salmon is right up there with chicken, in terms of versatility. There are countless ways to prepare salmon.  Lately, we've been doing lots of experimenting to discover new recipes.  This is one of our new recipes--found in Taste of Home.  I really love this recipe because of how easy it is!  It gives you some mild tangy-sweetness, isn't too mustard-y, and has an awesome crunchy coasting to complement the tender-flakiness of the fish.  Mmmmmm.... 


Honey-Nut Encrusted Salmon

2lbs salmon (slab from Costco, cut into 4-5oz. fillets)

2.5 T honey
2.5 T dijon mustard
kosher salt & fresh ground pepper

2 slices wheat bread, toasted then processed into crumbs
4 T finely chopped walnuts
1/2 t dried thyme
2 t olive oil

Preheat oven to 400 degrees.  Combine honey & mustard in a small bowl.  Pour over fillets.  Season with salt and pepper.  In a separate bowl, combine bread crumbs, walnuts, thyme, and oil with a fork.  Press the crumb mixture atop the fillets.  Bake for 12-15 minutes, depending on the thickness of your fillets.  


Sunday, November 24, 2013

Chicken Pad Thai made Healthier


This dish was surprisingly good!  I found it on the blog, Stuff We Ate.  After a few small adjustments, this recipe made a healthy, very flavorful Thai dish that was definitely nice for a change.

My family was a little reserved when I made this dish--a little hesitant to try it and a little setback by its looks and use of spaghetti squash.  Up until now, spaghetti squash has been a bit of a mystery to us.  No doubt, we had heard of it, but we didn't know the reason behind the same.  It literally shreds into a spaghetti-like consistency.  I loved it, and it will probably be making much more of an appearance in my cooking from here on out.

In order for spaghetti squash to be shredded into strands of squash spaghetti, and used in recipes like this one, it must first be baked. To do so:
Cut it in half, lengthwise
Salt & Pepper flesh
Place halves, rind side up, on baking sheet
Bake at 350
45-55 minutes
Remove to cool
Shred with a fork
Ready to add to your recipes as a pasta substitute!
NOTE: Spaghetti squash is difficult to cut--if you're really having a hard time, consider microwaving it whole for about a minute or two to soften it.


Spaghetti Squash Chicken Pad Thai


1 large spaghetti squash, prepared as mentioned above
1 c. chopped bok choy
1 c. chopped carrots
1 small can water chestnuts, drained and sliced
1 t. minced garlic
3 diced chicken breasts
EVOO

While spaghetti squash is cooling, saute chicken, carrots, bok choy, and garlic until cooked through.  Season with salt and pepper, and add in water chestnuts.  Set aside.

For the sauce:
1/2 c. chicken broth
3 T peanut butter
1.5 T rice vinegar
2 T soy sauce 
1 T sriracha sauce (2 T if you like it spicy)

Whisk sauce ingredients together and pour into pan, heat until hot, bubbly, and smooth. Combine chicken/vegetable mixture and spaghetti squash in with sauce.  Toss to coat everything.  Check for taste--more soy sauce? more sriracha?  Definitely top with garnishes!  

Garnishes:
dry roasted peanuts
cilantro
lime 
scallions

This is one of those recipes that tastes even better reheated the next day!


Sunday, October 20, 2013

Rich, Asian-Inspired Grilled Salmon

Salmon has got to be one of my favorite proteins to eat...right up there with chicken.  The options are limitless.  If you don't think you like fish, you probably like this salmon.  It is perfect for dinner--quick to prepare, rich in flavor, requires basically no marinating time, and goes great with a number of side dishes. 

I like to make this with some sort of green vegetable and a baked potato, salad, or even some homemade mac'n'cheese. 

It's so yummy!

Seriously, give this recipe a shot and you won't be disappointed.  Of the many salmon recipes in my arsenal, this is probably the best.

Grilling Hints:  As with most recipes, this will taste best grilled over charcoal, but a gas grill works great as well.  Clean the grates really well before cooking this, as you want them to be smooth as possible.  Coat the grates generously with vegetable/olive oil.  Once you put the salmon on the grill, don't move it around too much.  Let it cook for a good 5 minutes before flipping it over.  I use two spatulas to flip my salmon fillet so i can get all the way under it and prevent it from breaking mid-way.  I like to cook my salmon whole for presentation purposes, but you could also cut it into individual fillets.   If you follow these steps with the cleaning, oiling, and getting all the way under the salmon during the flip, you should have great success with grilling.  This recipe honestly does taste better grilled than baked. 


Barefoot Contessa's Asian Grilled Salmon

2-3 lbs. salmon (Costco has nice-sized fillets)
salt & pepper

Marinade:
2 T Dijon mustard
3 T soy sauce
6 T olive oil
1 t. minced garlic

Salt and pepper your salmon fillet.  Mix up marinade with a whisk.  Pour half of the marinade over your salmon; reserve the other half for topping cooked salmon.  Allow salmon to sit in marinade while grill is preheating.

Grill salmon over medium-high heat.  Grease the grill grates with oil to prevent sticking as much as possible.  First cook skin-side down for 5 minutes.  Flip and cook another 5 minutes.  Do NOT overcook the salmon.  If it is still a little undercooked in the center, don't worry--it will continue to cook after being taken off the grill.  Remove salmon from heat.  Pour reserved marinade over it, and allow it to rest for 10 minutes.


Monday, October 14, 2013

Sharing my cooking experiences

I have not posted anything new in quite some time.  The main reason being, aside from being busy, I have not found many great recipes lately.  No recipes worthy of sharing.  I have, however, been reviewing many of the recipes I've tried.  I pin them onto a Pinterest board.  To check out some of the recipes I've been trying lately, and see what I have to say about them:

Wednesday, September 4, 2013

BBQ Beer Pork Chops


Pork chops are inexpensive and generally come in pretty big packages.  Therefore, when I buy them, I usually prepare half and freeze half for later.  This is a great recipe for those days when you are really needing to hit up the grocery store but you're too lazy, and instead, you're trying to 
scrounge up something with whatever scraps you have left.   Pork chops. Potatoes. Ketchup. Brown sugar. Beer.  Ingredients that I'm sure you've already got on hand.

BBQ Beer Pork Chops

5-8 pork chops (boneless)
salt & pepper
2-3 T. olive oil (or butter)

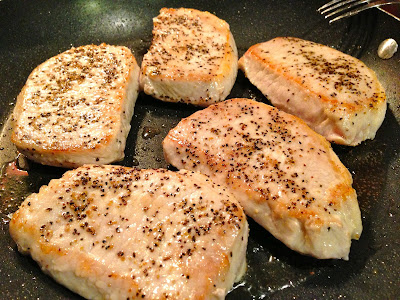
Season pork chops and brown in oil over medium heat.  Remove from pan & set aside.

4-5 T. flour
1 bottle beer (anything but LIGHT beer)
1/2 c. brown sugar (light or dark)
1/3 c. ketchup
salt & pepper, to taste (maybe a pinch of crushed red pepper?)

Whisk flour into drippings leftover in pan.  Allow roux to cook for a minute, whisking constantly, to get rid of flour-y taste.  Deglaze pan by whisking in about half of the beer. Slowly whisk in remaining beer, ketchup, and brown sugar.  Stir until smooth and well combined.  Allow to simmer and thicken.  Add pork chops and their juices to sauce.  Turn to coat. Cover and continue simmering for about 10-15 minutes.  

Brown generously s&p-ed pork chops in EVOO.
Remove chops and make a roux with a few tablespoons of flour.
Deglaze pan with 1/2 bottle of beer, then whisk in remaining beer, ketchup, and brown sugar.

Allow sauce to simmer and reduce.  Add back in chops and their juices.  Turn to coat.  Allow them to simmer for another few minutes.  Definitely serve over mashed potatoes.